 Lens
Lens
How to Photograph Items for Accurate Valuation
Clear, complete photographs help a reviewer identify an item, assess its condition, and narrow the likely value range. Use this guide to capture the views and details that matter before requesting an estimate.
Drop a item photo here or tap to check
JPG, PNG, WebP, HEIC • Max 50MB

Analyzing with AI…
Matching visual details and value clues


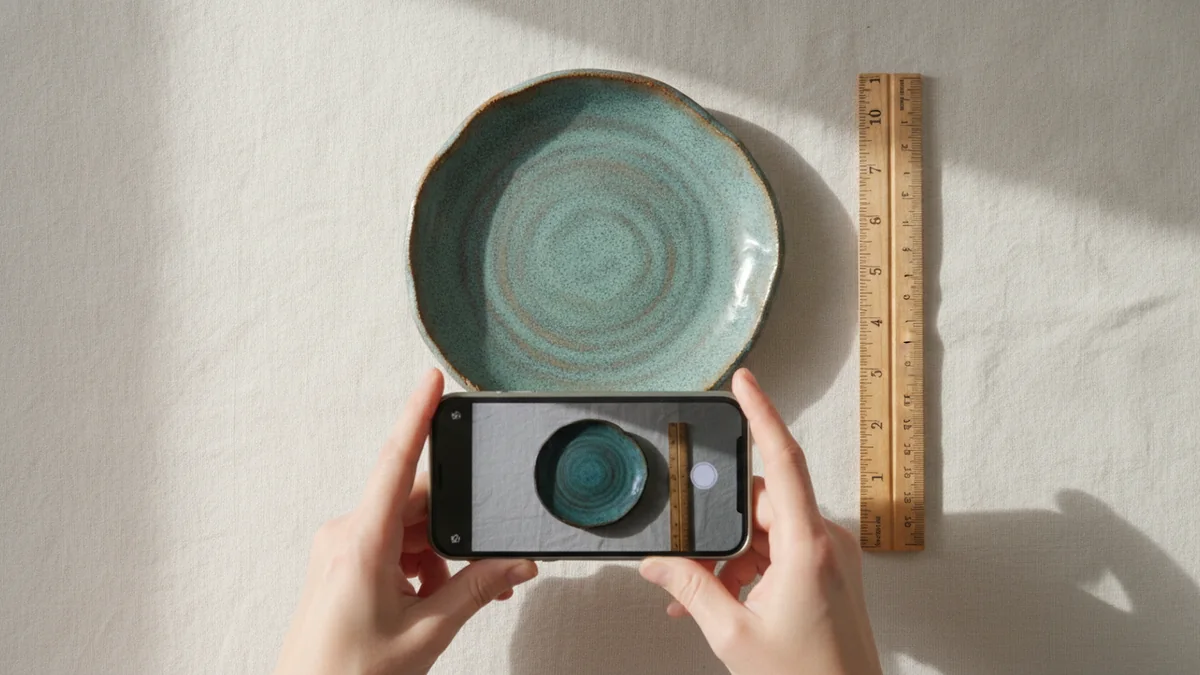
The essentials of valuation photography
Photograph the complete item in soft, indirect light against a plain background. Add front, back, side, top, bottom, and interior views where relevant. Include sharp close-ups of marks, construction, wear, damage, and repairs, plus a ruler or tape measure for scale. Accurate documentation is more useful than flattering presentation.
How to use this tool
Choose a safe photography area
Clear a stable surface near indirect daylight and use a plain, nonreflective background. For heavy or fragile items, photograph them where they stand rather than moving them unnecessarily.
Clean the lens, not the item
Wipe the camera lens with a suitable cloth. Avoid polishing, washing, repairing, or removing labels from the object before its condition has been documented.
Take complete overall views
Start with the front and back, then photograph both sides, top, bottom, underside, and interior where relevant. Keep the entire item inside each frame.
Add a scale reference
Place a ruler or tape measure beside the item and record its dimensions in writing. Keep the scale on the same plane as the feature being measured.
Capture identification details
Photograph signatures, labels, hallmarks, serial numbers, stamps, inscriptions, pattern numbers, and distinctive decoration. Include a wider image showing each mark's location.
Record construction and materials
Take close-ups of joints, hinges, fasteners, seams, edges, backs, bases, linings, clasps, settings, and internal parts that can be viewed safely.
Document every condition issue
Show cracks, chips, dents, scratches, stains, wear, missing components, repairs, and restoration. Use angled light and a ruler when a flaw is shallow or difficult to size.
Review before submitting
Enlarge each image and confirm that marks and flaws are sharp. Retake blurred or reflective views, retain the originals, and attach concise notes about dimensions, history, completeness, and function.
Why better photographs support a better valuation
A valuation begins with identification. A reviewer needs to see the item's shape, materials, proportions, construction, marks, and condition before comparing it with relevant market examples. If a photograph hides the underside, crops an edge, or loses detail to glare, an important clue may be missing.
Good photographs do not make an item more valuable, but they reduce uncertainty. A complete photo set can help distinguish hand decoration from a transfer, solid silver from silver plate, an old repair from a new break, or period hardware from a later replacement.
Think of the photo set as visual documentation rather than a sales listing. Attractive staging is less important than neutral color, sharp focus, honest condition views, and enough angles to understand the whole object.
- Show the entire item before taking detail photographs.
- Keep all edges, handles, feet, mounts, and accessories inside the frame.
- Photograph marks both close up and in their location on the item.
- Record visible flaws instead of positioning the object to conceal them.
- Include dimensions or a visible scale reference.
Use soft light and control reflections
Soft window light or an overcast outdoor setting usually gives a more readable result than direct sun. Position the item near the light rather than in a bright beam, then turn it slowly until decoration and surface color appear clear without deep shadows.
Avoid direct flash on glass, glazed pottery, polished wood, framed art, silver, and other reflective surfaces. Flash can create white hotspots, obscure inscriptions, and make scratches or crazing disappear. If one side remains dark, place white card opposite the window to reflect a little light back onto the object.
Raking light is useful for shallow details. Move a lamp to the side so light travels across the surface at a low angle, revealing scratches, impressed marks, worn carving, dents, raised paint, repairs, or changes in texture.
- Turn off mixed-color room lights when using daylight.
- Move the light or object instead of relying on heavy editing.
- Photograph reflective objects from a slight angle to move glare away from key details.
- Use side lighting for faint marks, texture, and surface irregularities.
Keep the item sharp, neutral, and measurable
Use a clean, plain background that contrasts gently with the object. Mid-gray, off-white, or matte black may work depending on the item's color, but patterned fabric and clutter can confuse outlines and automatic image analysis.
Hold the phone with both hands, brace your elbows, or use a small tripod. Tap the important area on the screen to set focus, then check the image at full size before moving on. If lettering looks soft when enlarged, take the photograph again from slightly farther away rather than using digital zoom.
Record height, width, depth, diameter, and weight where useful. Place a ruler or tape measure beside the object in at least one image, keeping it on the same plane as the measured feature so perspective does not exaggerate the size.
- Clean the camera lens before starting.
- Use the main rear camera rather than a low-resolution messaging preview.
- Leave a narrow border around the complete object.
- Keep the camera parallel to flat items such as prints, coins, and documents.
- Add written measurements even when a ruler is visible.
Photograph marks and construction clues
Maker's marks, hallmarks, signatures, labels, serial numbers, model numbers, stamps, inscriptions, and ownership marks can materially change identification. Take one close photograph that makes the mark readable and one wider photograph that shows exactly where it appears.
Construction details can help separate an older item from a later reproduction or identify a replaced component. Photograph joints, fasteners, hinge shapes, saw marks, seams, casting lines, hems, linings, backs, bases, feet, and internal mechanisms where they can be accessed safely.
Do not trace over a faint mark with pen, chalk, graphite, or polish. Try side lighting and several angles instead. Preserve the untouched surface so a later in-person examiner can inspect it without added material.
- Underside and base marks
- Paper labels and remnants of labels
- Signatures, monograms, and date codes
- Serial, patent, and registration numbers
- Joinery, screws, nails, hinges, clasps, and mounts
- Backs, linings, frames, and internal compartments
Document condition without hiding flaws
Condition can affect value as much as age or maker. Photograph every visible chip, crack, dent, stain, scratch, tear, missing part, area of wear, and sign of restoration. Include a medium-distance view for location and a close-up for severity.
Repairs are often easier to understand when photographed from more than one side. For ceramics, show both the front and back of a repaired crack when possible. For furniture, include replaced hardware holes, reinforced joints, altered surfaces, and the underside around repaired legs.
Do not apply oil, wax, silver polish, adhesive, or household cleaner merely to improve the photographs. Cleaning can remove patina, residues, finishes, or labels that provide useful evidence, and an unsuitable repair can reduce market interest.
- Show flaws in normal light and with side lighting if texture is important.
- Place a ruler beside cracks, losses, or tears when their size is unclear.
- Photograph loose, detached, or replaced parts separately.
- Mention odors, instability, nonworking mechanisms, or other issues a photograph cannot capture.
Category-specific photo examples
Different categories depend on different evidence. A single front view may be adequate for recognizing a general form, but it rarely shows enough information for a useful value range. Adapt the photo sequence to the materials, construction, and condition risks of the item.
Keep accessories and related pieces together, but also photograph each component separately. Boxes, cases, receipts, certificates, manuals, dust bags, fitted inserts, and original packaging may help establish completeness and provenance, although paperwork should still be checked independently.
Jewelry, watches, and silver
Photograph the complete piece, clasp, reverse, links, setting, movement or case back where safely accessible, and every hallmark. Use diffused light to control glare, and include weight and dimensions. Do not open a watch case or remove a stone unless you have the appropriate skill and tools.
Ceramics, porcelain, and glass
Show the profile, rim, foot, base mark, interior, handles, decoration, and any chips or hairline cracks. Backlighting may help reveal cracks in translucent ceramics, while angled light can show grinding, mold seams, bubbles, wear, and restoration.
Furniture and wooden objects
Capture the front, back, sides, top, underside, drawer interiors, joinery, hardware, feet, and surface wear. Include overall dimensions and close-ups of veneer, carving, labels, locks, secondary woods, replaced screws, repairs, and signs of alteration.
Coins, medals, and paper collectibles
Photograph both sides with the camera parallel to the surface, plus the coin edge or the document's reverse. Preserve natural color, avoid sharpening filters, and show folds, tears, stains, edge knocks, mounting residue, or cleaning marks clearly.
Paintings, prints, and framed works
Take a straight, evenly lit image of the whole work, followed by the signature, surface, corners, frame, reverse, labels, stretcher, plate mark, and edition notation. Photograph the work outside the frame only when removal can be done without risk.
Toys, cameras, and mechanical collectibles
Show all sides, controls, battery compartments, serial plates, accessories, boxes, and areas of corrosion or missing paint. State whether the mechanism works, but do not force seized controls or power equipment with damaged wiring.
What affects an item's value
Photographs support valuation by revealing the characteristics buyers and specialists compare. Maker, model, date, material, rarity, size, subject, quality, condition, completeness, and provenance can all matter, but their importance varies by category.
Market context also changes the result. Retail asking prices, auction estimates, dealer purchase offers, insurance replacement figures, and completed sale prices represent different types of value. Location, shipping difficulty, season, fashion, and the number of interested buyers can further widen the range.
A rare variation in poor condition may be worth more than a common version in excellent condition, while an unsigned decorative piece can still have demand because of its design. Identification should come before assumptions about age, scarcity, or price.
| Factor | What photographs should show | Why it matters |
|---|---|---|
| Maker or attribution | Marks, labels, signatures, construction, and overall style | Known makers and documented workshops may attract stronger demand. |
| Condition | Wear, cracks, repairs, losses, fading, corrosion, and alterations | Damage may affect usability, appearance, originality, and restoration cost. |
| Completeness | Lids, stands, keys, attachments, cases, sets, and packaging | Missing original parts can change desirability and comparison options. |
| Materials | Surface, grain, weave, metal marks, stone setting, and exposed edges | Material identification helps place the item in the correct market category. |
| Age and originality | Joinery, hardware, backs, bases, patina, and replaced elements | Original components and finishes may be valued differently from later changes. |
| Provenance | Labels, inscriptions, receipts, exhibition records, and related documents | Credible ownership history can support attribution but requires verification. |
Prepare image files without changing the evidence
Crop only enough to remove irrelevant space, and keep the original files. Mild exposure correction can make an underlit image readable, but strong filters, background replacement, artificial blur, color shifts, and aggressive sharpening can distort condition or materials.
Send full-resolution images when possible. Messaging services and screenshots may compress fine lettering, hallmarks, brushwork, and surface cracks. If files must be reduced, preserve separate close-ups of the details most likely to affect identification.
Use clear file names so the sequence is easy to review, such as overall-front, base-mark, left-side, repair-detail, and ruler-view. Add a short written note identifying the material, dimensions, known history, location, and any defects that are difficult to see.
- Retain original, unedited files.
- Check that orientation and color look natural.
- Remove location metadata if privacy is a concern.
- Do not publish visible personal addresses, receipts, or identifying documents.
- Group photographs from the same item in one folder.
Know the limits of a photo-based appraisal
Photographs can support identification and a preliminary value range, but they cannot confirm every material, date, maker, or condition issue. Weight, sound, smell, internal construction, microscopic features, chemical composition, hidden repairs, and mechanical performance may require direct examination or testing.
A photo-based result is not a certified appraisal and should not be treated as authentication. High-value jewelry, fine art, archaeological material, important documents, and objects with disputed provenance may need inspection by an appropriate specialist. Insurance, tax, estate, legal, and charitable donation purposes can also require a formally prepared report.
Market values change, and visually similar items can sell for very different amounts. Treat an online estimate as a research starting point, then verify significant conclusions through documented comparisons and qualified in-person review when the financial stakes justify it.
- Photos cannot reliably expose every concealed repair or replaced component.
- A signature alone does not prove authorship.
- A hallmark image may be insufficient if the mark is worn, altered, or counterfeit.
- Asking prices do not establish what buyers have paid.
- Ownership stories are useful leads but should be supported by records.
Example value ranges
These broad USD ranges are for triage only. Exact issue, condition, authenticity, and recent sold comps decide real prices.
| Example | Broad range (USD) | Main clues |
|---|---|---|
| Common unsigned decorative ceramic | Under $50 to a few hundred | Form, decoration method, base, condition, size, and regional demand |
| Marked studio or factory ceramic | About $50 to several thousand or more | Readable mark, artist, pattern, date, rarity, restoration, and comparable sales |
| Vintage costume jewelry piece | Under $25 to several hundred | Maker, design, materials, missing stones, clasp, plating wear, and set completeness |
| Silver object or flatware group | From metal value to several thousand or more | Hallmarks, weight, maker, purity, form, age, condition, and whether the set is complete |
| Small antique or vintage furniture item | Under $100 to several thousand or more | Maker, design, wood, joinery, original surface, repairs, size, and local demand |
| Signed print or work on paper | Under $50 to many thousands | Artist, edition, printing method, authenticity, image quality, paper condition, and provenance |
| Vintage mechanical collectible | Under $50 to several thousand or more | Model, rarity, serial number, operation, corrosion, accessories, box, and replacement parts |
Use a complete photo set to begin your research
For an initial visual search and value-oriented review, we recommend Lens AI: Scan & Image Search at LensApp.io. Start with a sharp overall photograph, then add marks, underside views, measurements, construction details, and condition close-ups so the result has more evidence to work from.
Use the output as a research lead rather than a final appraisal. Compare the suggested identification with the physical item, review relevant market evidence, and seek an appropriate specialist when authenticity, legal use, insurance coverage, or substantial value is involved.
Related tools
Related value guides
More value guides: How much is it worth · VHS tapes · Old Pyrex · Beanie Babies · Signs old stuff is valuable · AI valuation vs appraiser · Most valuable items at home · Pokemon card value · Coin value checker · Watch value checker · Jewelry value checker · Antique value checker · Funko Pop value · Vinyl record value.
Frequently Asked Questions
How many photographs should I take for a valuation?
There is no fixed number, but most items need more than one or two images. Capture complete front and back views, all relevant sides, the underside, marks, construction details, measurements, and every flaw. Complex objects, sets, and mechanical items may require considerably more.
Should I use flash when photographing antiques?
Usually not when the surface is glossy, polished, glazed, metallic, or behind glass. Flash can hide details with glare. Soft window light, diffused lamps, or an overcast outdoor setting generally produces more readable photographs.
Can Lens App identify an item from one photograph?
Lens App may provide useful visual matches from a clear overall image, but one view can omit marks, damage, scale, and construction. Add several angles and close-ups, then verify any suggested identification against the object and reliable market references.
Should I clean an item before photographing it?
Remove loose background clutter, but avoid cleaning or polishing the item solely for the photographs. Chemicals, water, abrasives, oil, and polish can alter finishes, remove patina, damage labels, or erase evidence that helps with identification.
How do I photograph a faint maker's mark?
Place a light to one side so it travels across the mark and creates small shadows in the impression. Try several angles, keep the camera steady, and include both a close-up and a wider location view. Do not trace over the mark or use aggressive image filters.
Does Lens App provide a certified appraisal?
No. Lens App can support visual identification and preliminary value research, but it does not replace a certified appraisal, authentication, laboratory testing, or an in-person condition examination when those services are required.
What background is best for valuation photographs?
Choose a plain, matte background that provides gentle contrast with the item. Avoid patterns, reflective fabric, strong colors, and nearby objects that make the outline difficult to see or cause misleading color casts.
What should I do if Lens App gives several possible matches?
Compare each possibility with marks, dimensions, materials, construction, decoration, and condition. Upload clearer detail views if available, but do not choose a match based only on visual resemblance. Similar forms may have different makers, dates, and market values.
Can Lens App value paintings, jewelry, or coins from photos?
It can assist with initial visual research across these categories, provided the photographs are sharp and complete. High-value or disputed items may still require specialist examination because photographs cannot confirm every material, hidden repair, attribution, or authenticity issue.